|
Step 1: The proper way to hold the rabbit
The
picture below shows the proper way to hold the rabbit’s hind legs. First cradle the rabbit in your dominate arm with
its head resting in the curve of your elbow, this will help calm the animal down. With the rabbit in this position use your
less dominate hand and place the rabbits left back ankle between your ring and middle finger; then place the rabbits right
back ankle between your index finger and your thumb. If done correctly you can hold the back feet tightly with your thumb,
pinky and ring fingers. Then rest the rabbit, with head facing down, against your thigh. The rabbit usually struggles slightly
during this step and if not held correctly can brake one of their hind legs. I was taught to hold the rabbit’s hind
legs as I explained above because it greatly reduces the risk of broken legs. You have much more control this way.
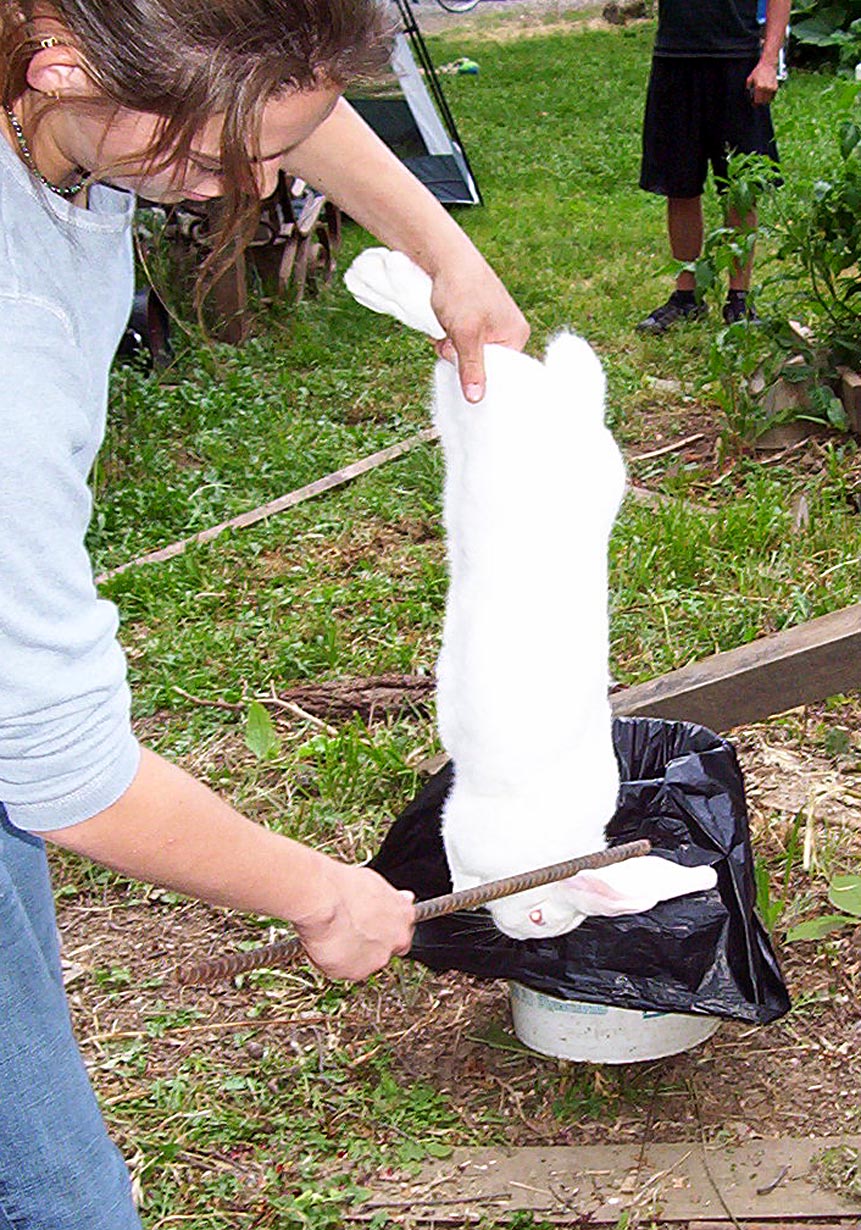
Step 2: Killing the Rabbit
Now
that you have the animal relaxed resting up against your thigh with its head facing down slowly straighten out the arm that’s
holding the rabbit. Then place your “killing device” against the nape of the rabbit’s neck, right behind
the ears as I have pictured below. I use the term “killing device” because there are several different things
you can use successfully. It really depends on your own personal preferences and what you are most comfortable using. I personally
use a 2’ piece of rebar because I like the length and the weight. My Grandfather preferred a 1’ long screwdriver
and used the handle as the impacting side. I was actually taught to butcher rabbits with an old ax handle. Now that you have
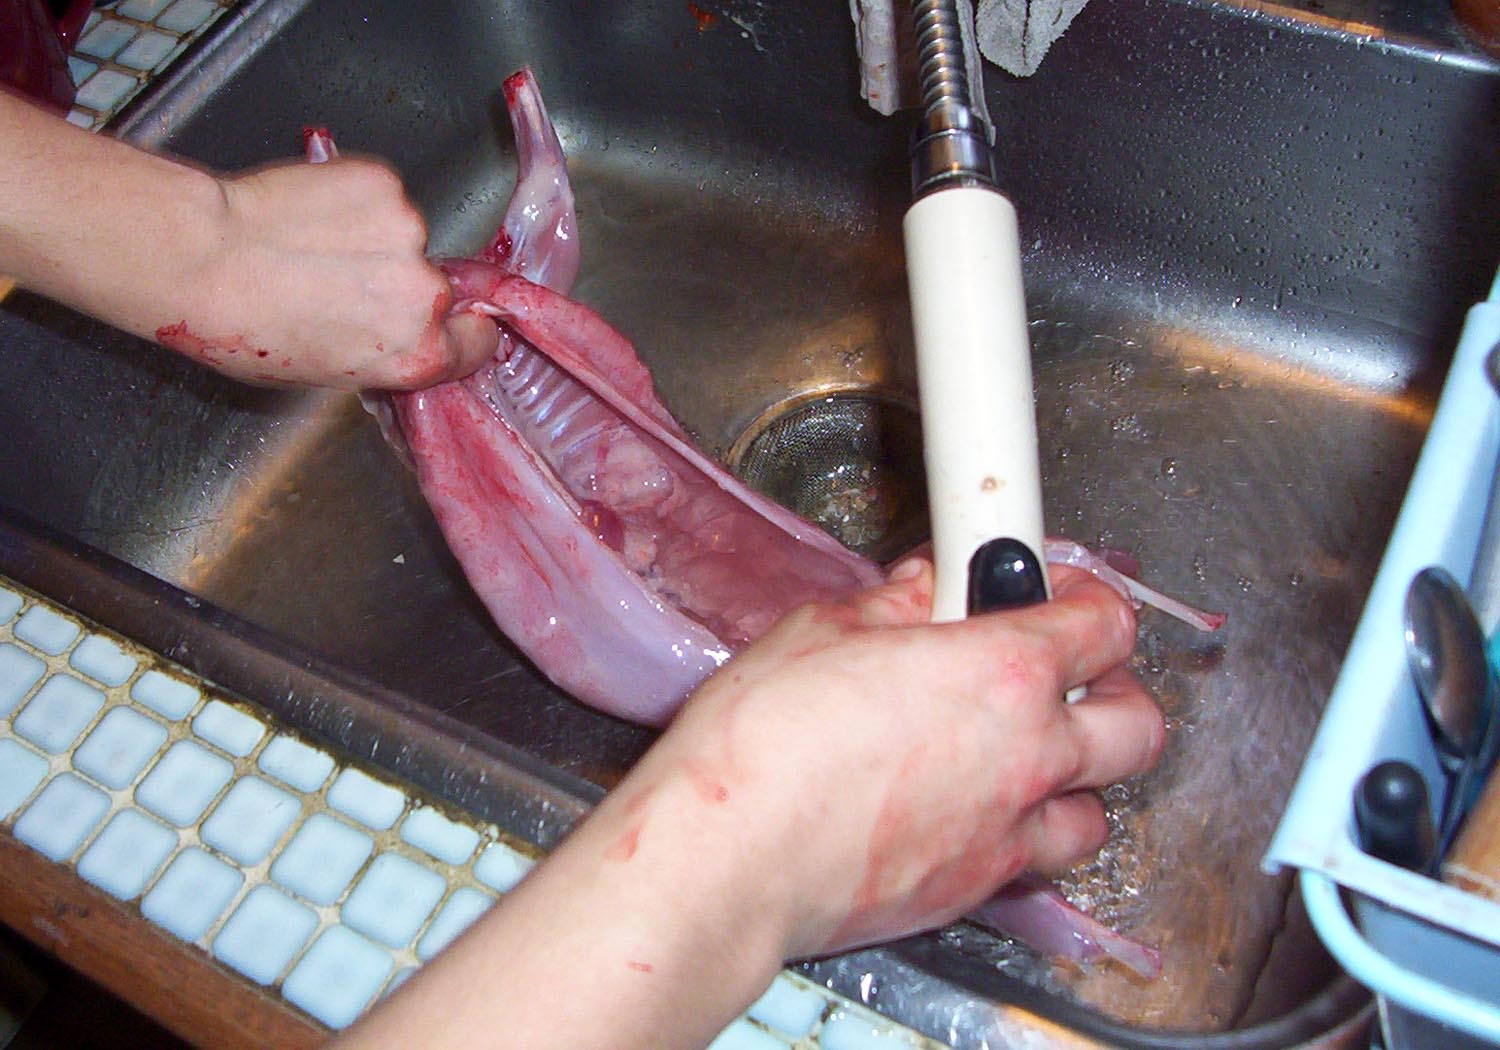
chosen a “killing device” and have it placed at the nape of the rabbit’s neck, right behind the ears you
should be judging your swinging angle. You want to make contact directly in this position because it will dislocate the scull
from the spinal cord if done correctly. This blunt force trauma will kill the animal right away if done correctly. If you
hit to high up on the shoulders you will create bruising which is pictured below. This is unattractive and takes away from
your finished product. Also if you hit to high up you will not kill the animal immediately and the rabbit may struggle and
suffer.
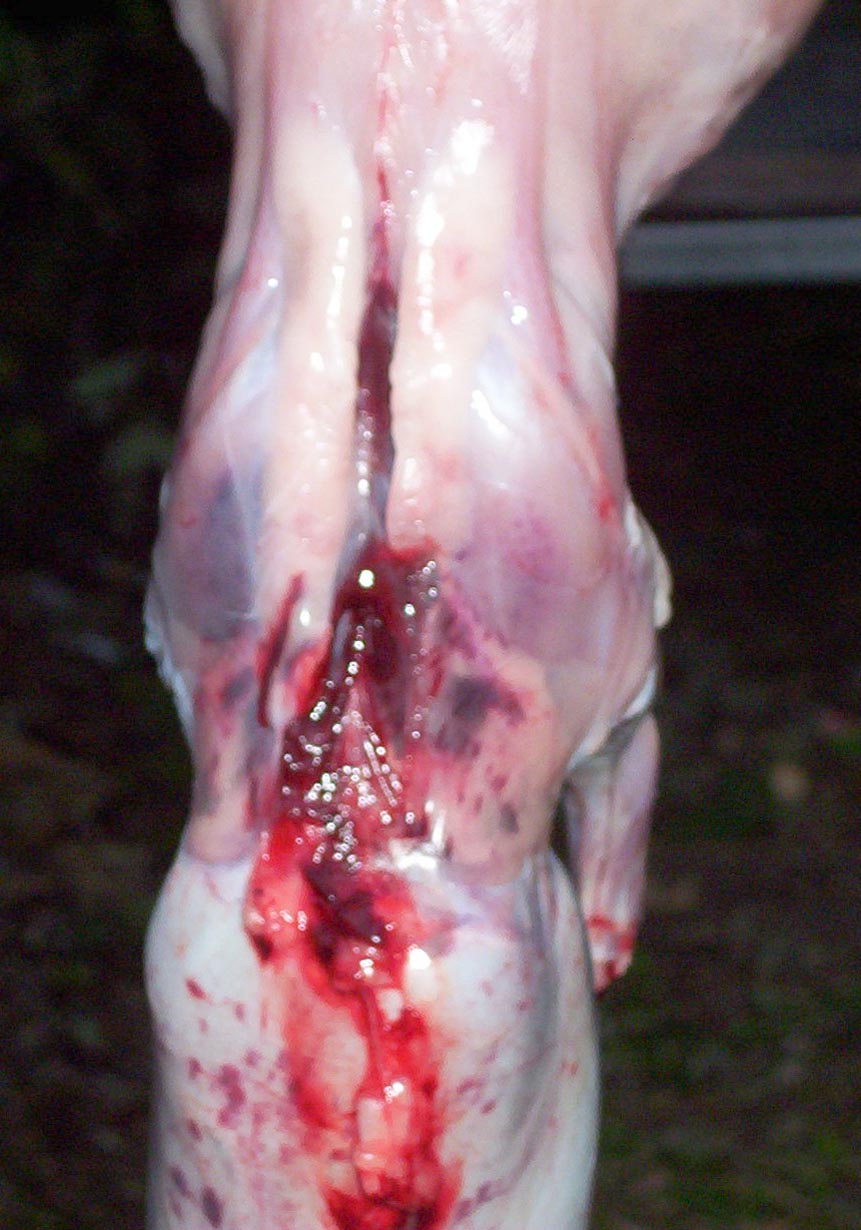
The picture below was a bad swing, notice the brusing on the shoulders.
|
|
| Brusing from a bad contact hit |
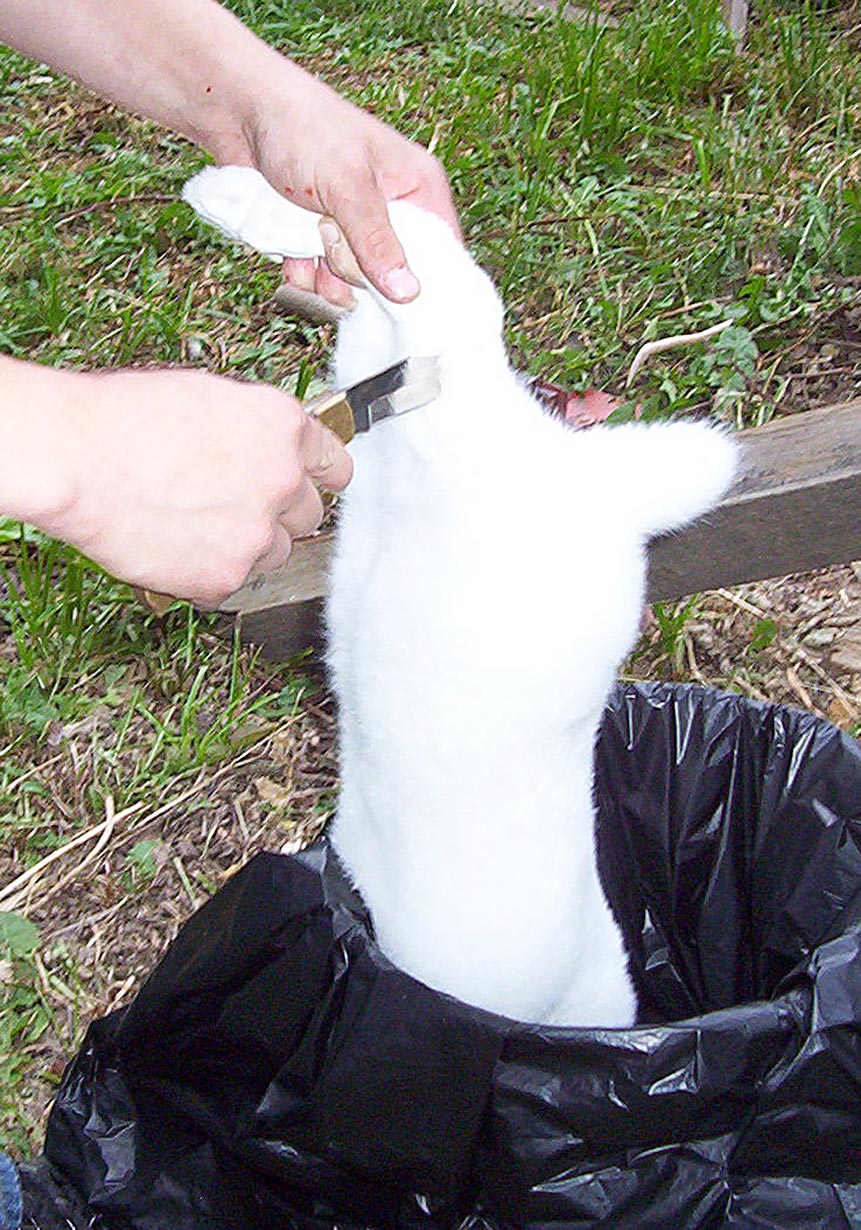
Step 3: Preparing the Rabbit for Hanging
After killing the rabbit place it head first into the bucket you have prepared, but
still keep a hold of the hind legs. The animals nerves will kick in about 10 to 15 seconds after you make the kill and it
will begin thrashing around. By placing the rabbit into the bucket you will minimize the thrashing around and by keeping a
hold of the hind legs you will help protect yourself from a stray hind leg kick. Remember the rabbit can still break bones
in their legs or other parts of their body so keep a firm hold on the hind legs. The nerves should stop after about 30 seconds.
Now take your knife and make your fist incision between the Achilles tendon and the bone right above the ankle. With a sharp
knife it just takes a slight poke and you’ve pierced the area straight threw.
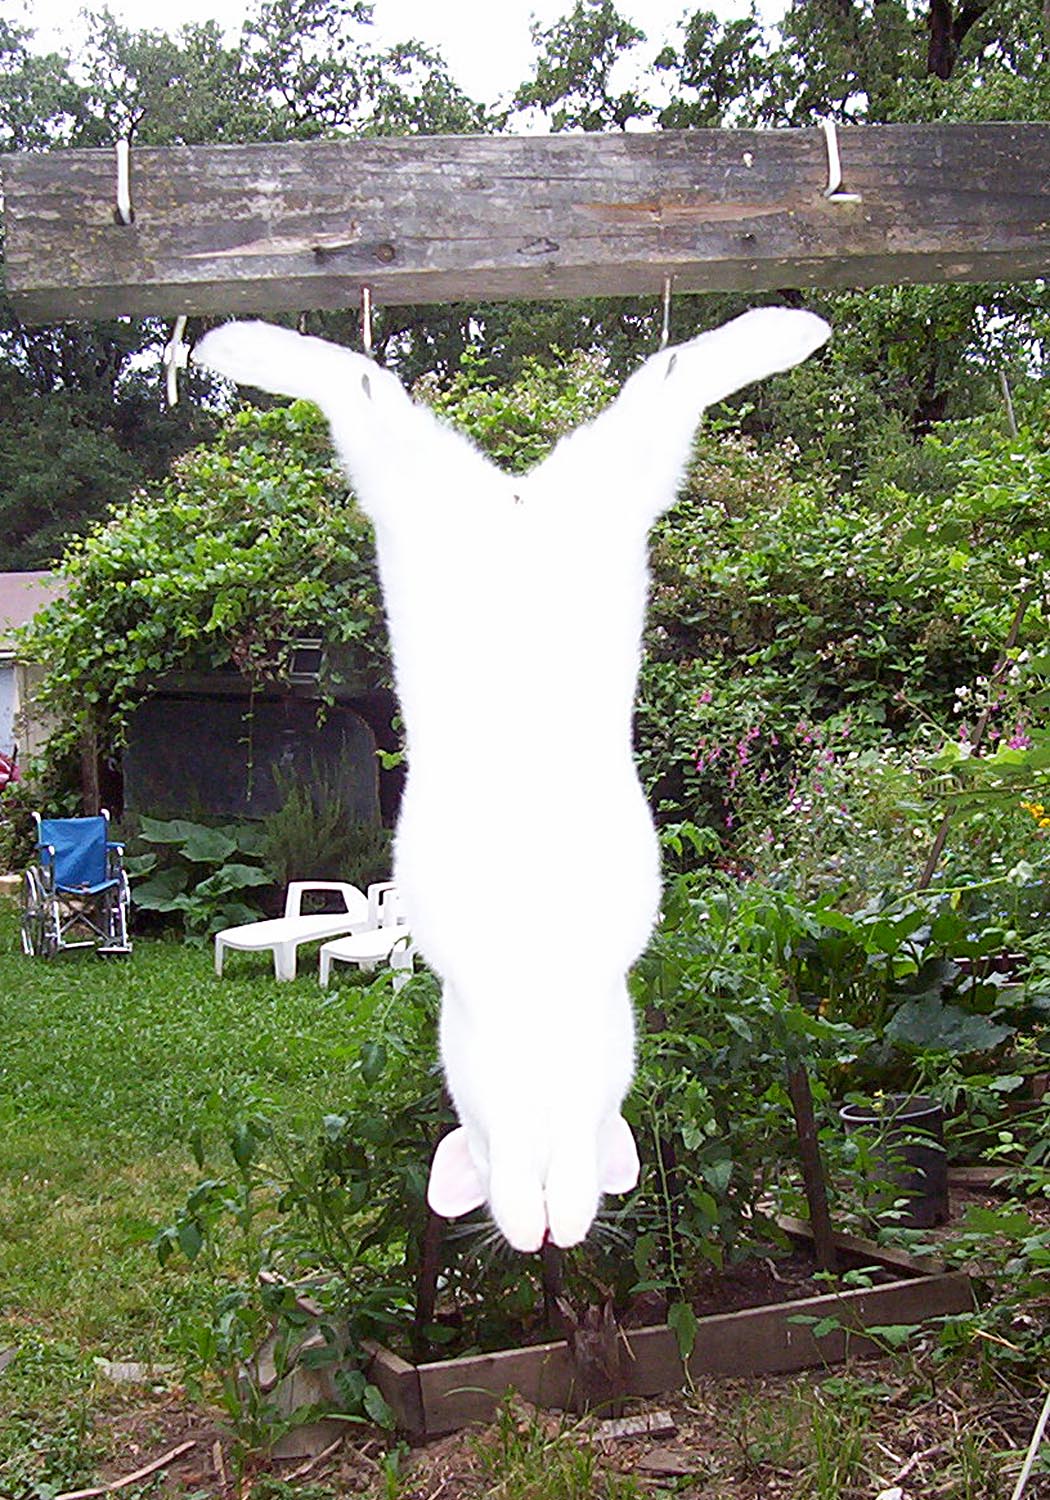
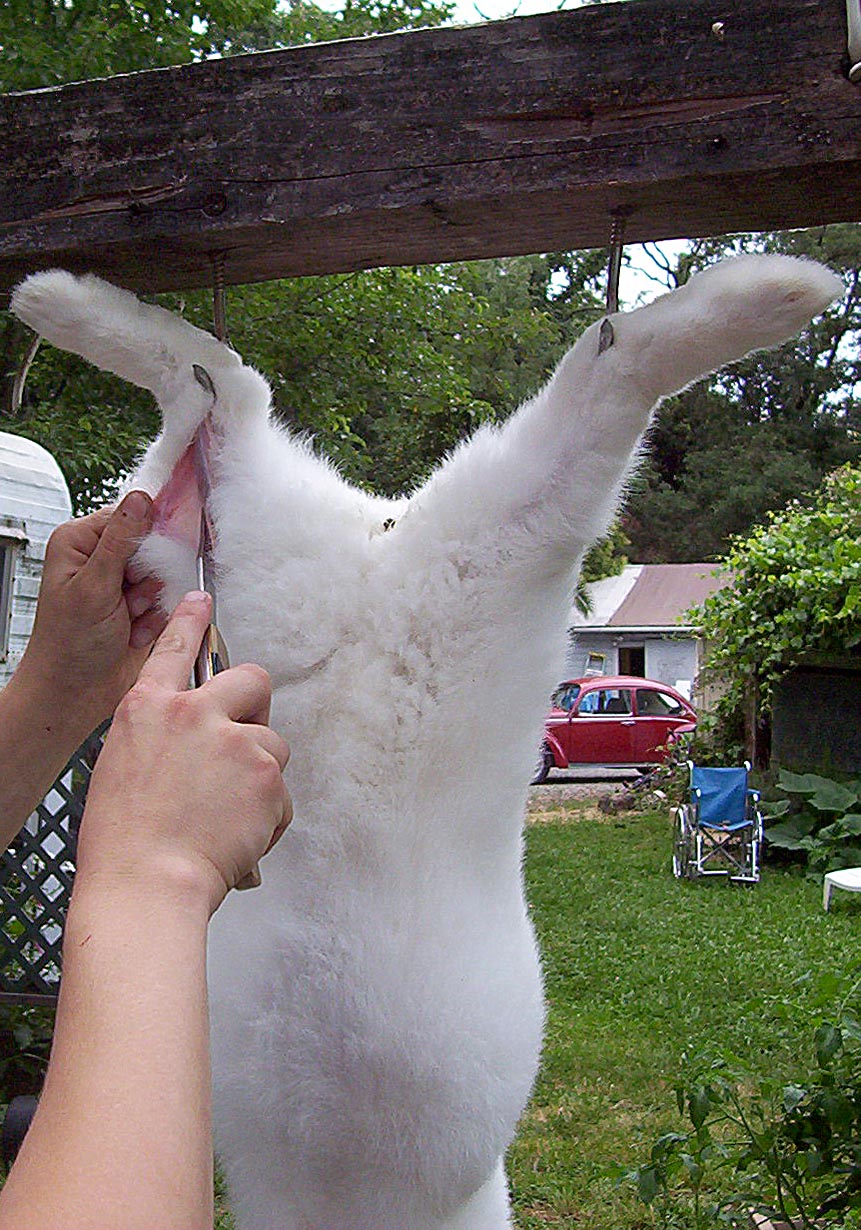
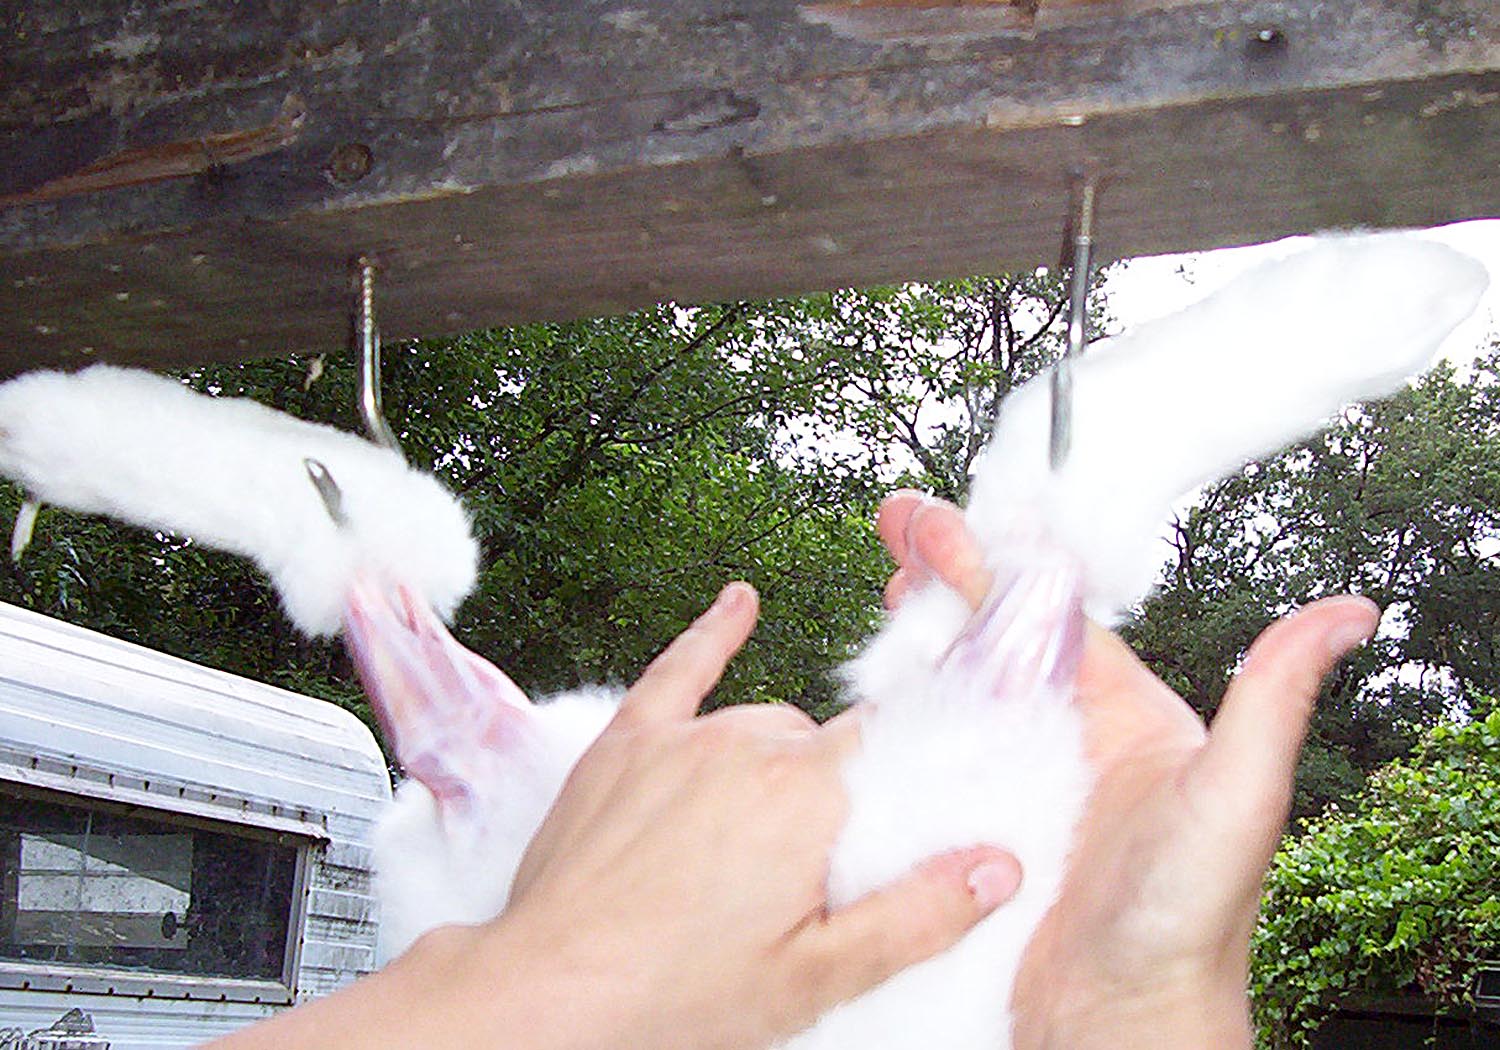
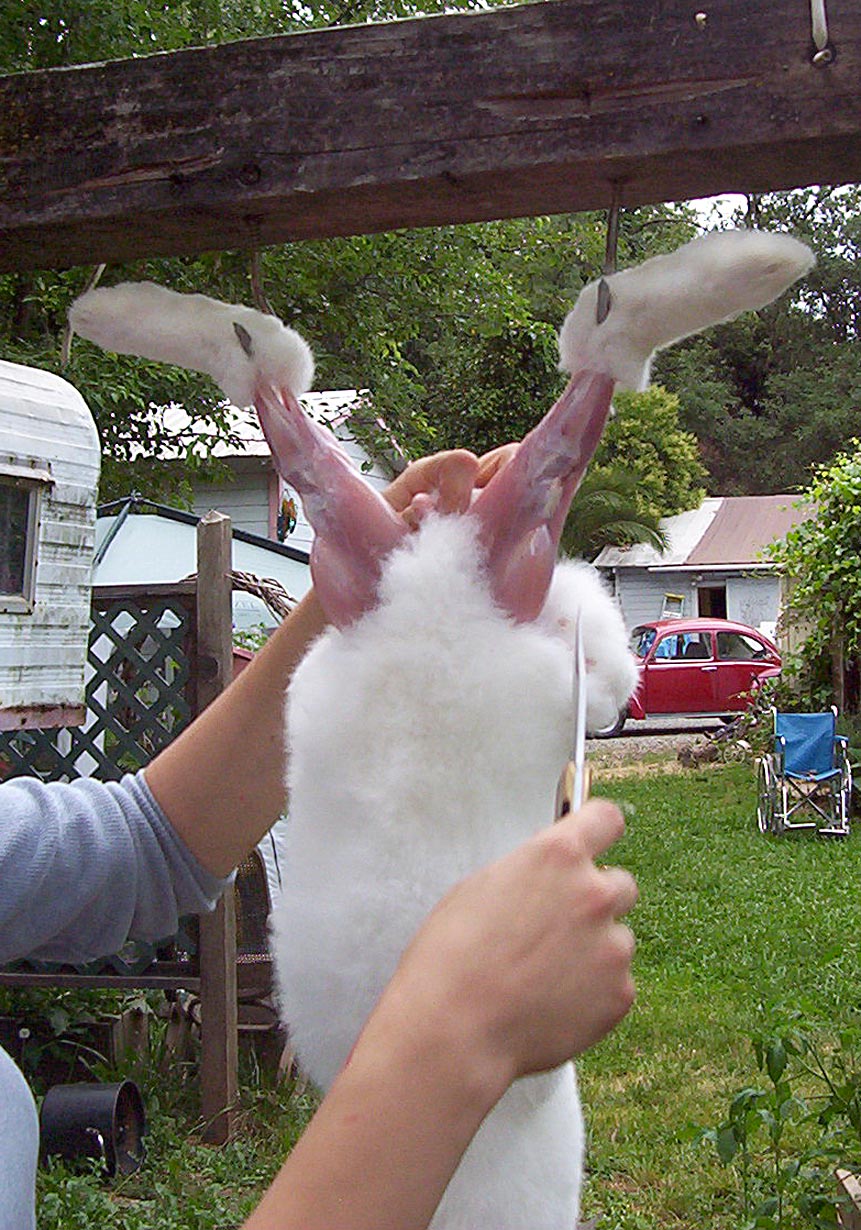
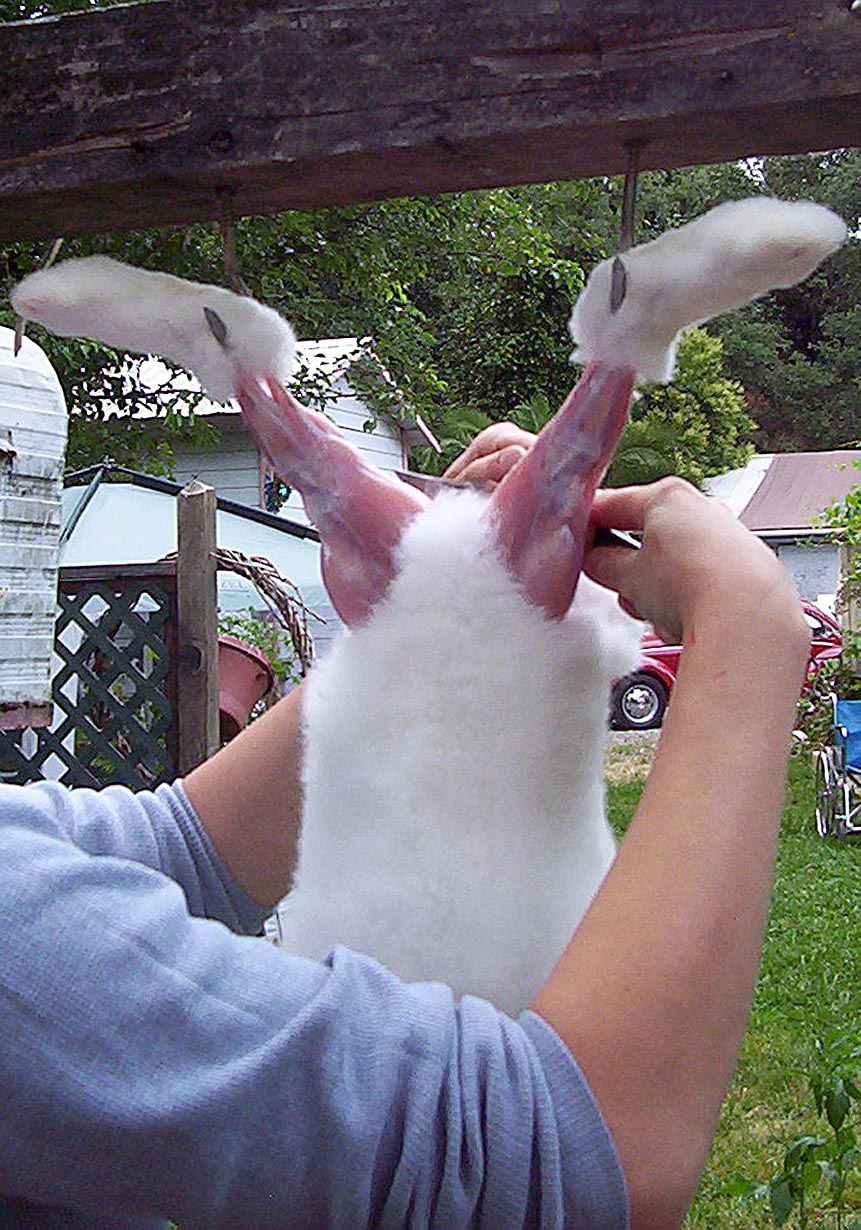
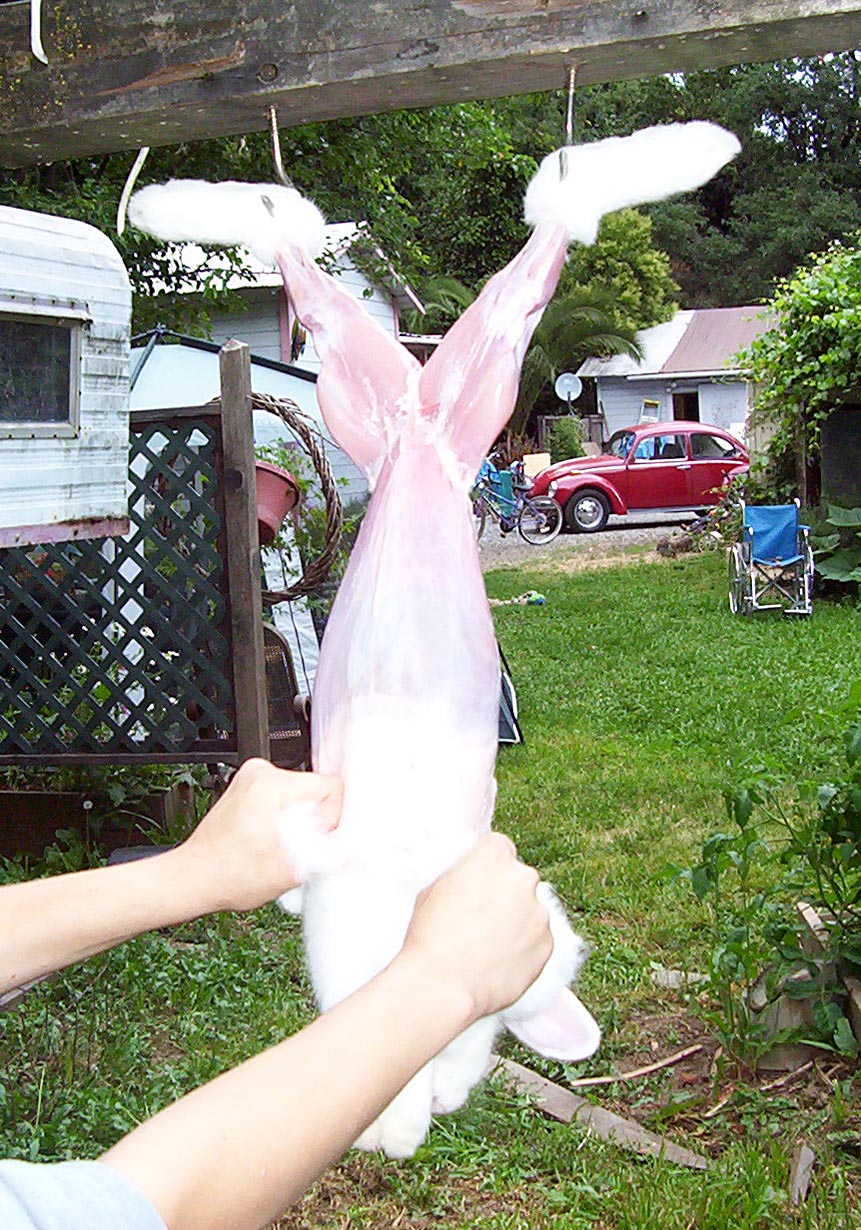
Step 4: Hang the Rabbit up
Using the hole you just created in the hind leg, hang the rabbit from your hook. Then repeat
the step and hang the other leg. Hang the rabbit so the belly is facing you. The proper height for your hooks should place
the rabbit’s midsection at about face level. Hanging the rabbit in this fashion will make things easier on your back.
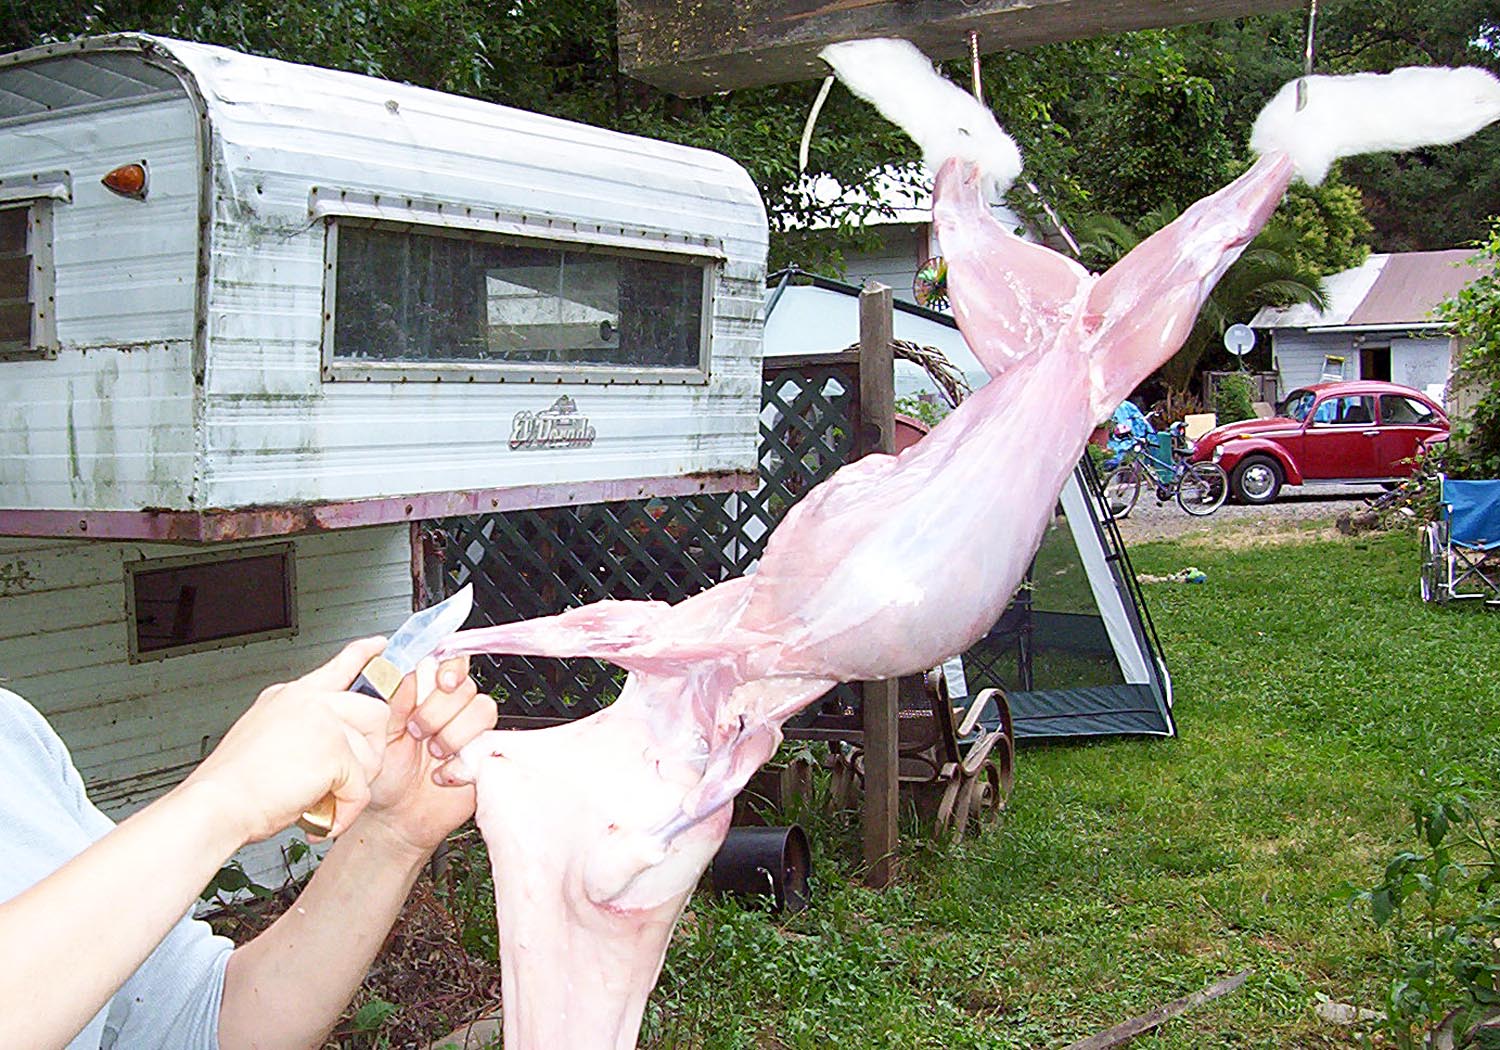
Step 5: Start Cutting
Take your less dominate hand and pinch the skin by one of the back ankles. Then
using your sharp knife begin cutting the skin away from the muscle. Continue pulling the skin away from the muscle
as shown in the picture below. Your cut should run from the ankle to the groin. Repeat this step on the other side.
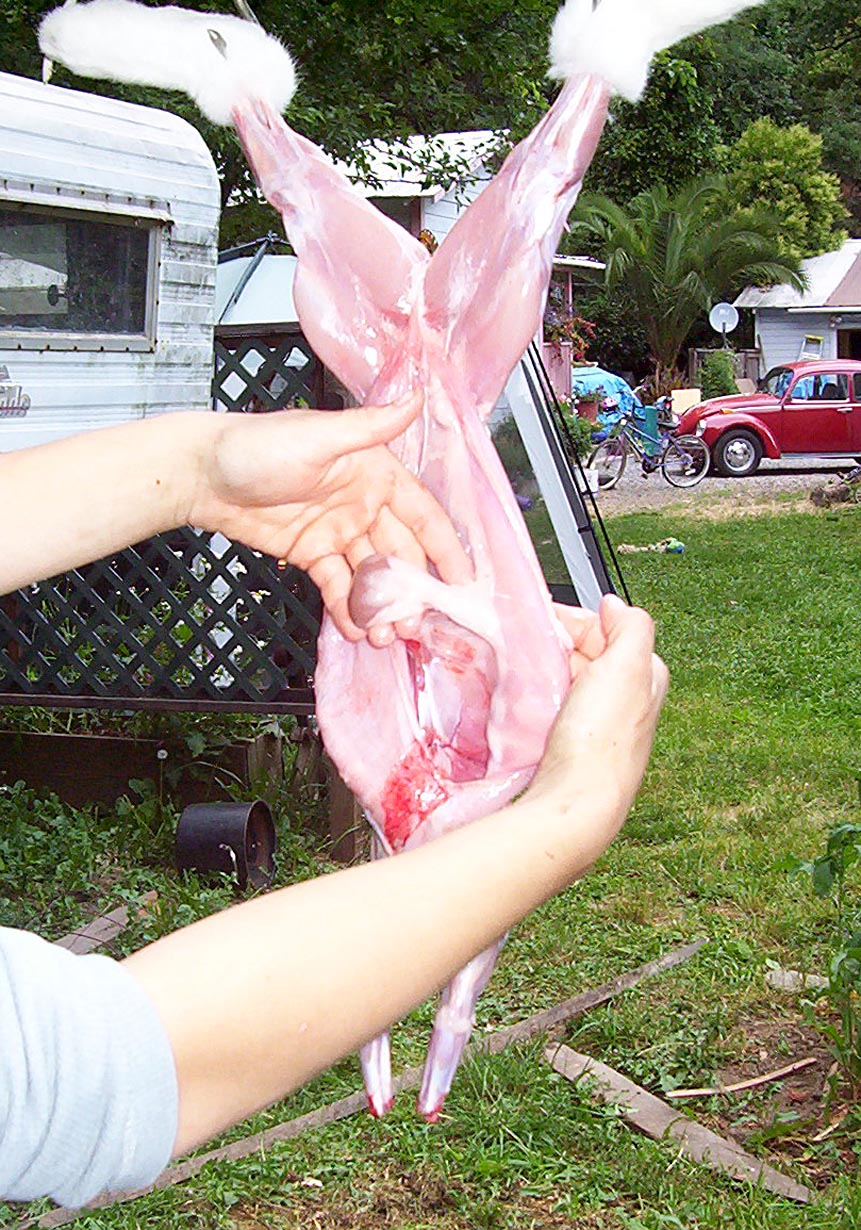
Step 6: Exposing the Back Legs
Now using your index finger like a hook, push threw the membrane holding the skin to the muscle up by the ankle so
that your finger comes out the other side. If done correctly your finger will be wrapped around the leg up by the ankle. This
is what I am doing to the leg on the right side of the picture below. Once you have the skin separated from the muscle you
can cut it free and then peel the skin down to the groin area. It should look like the leg on the left side of the picture
below. Repeat this with both back legs.
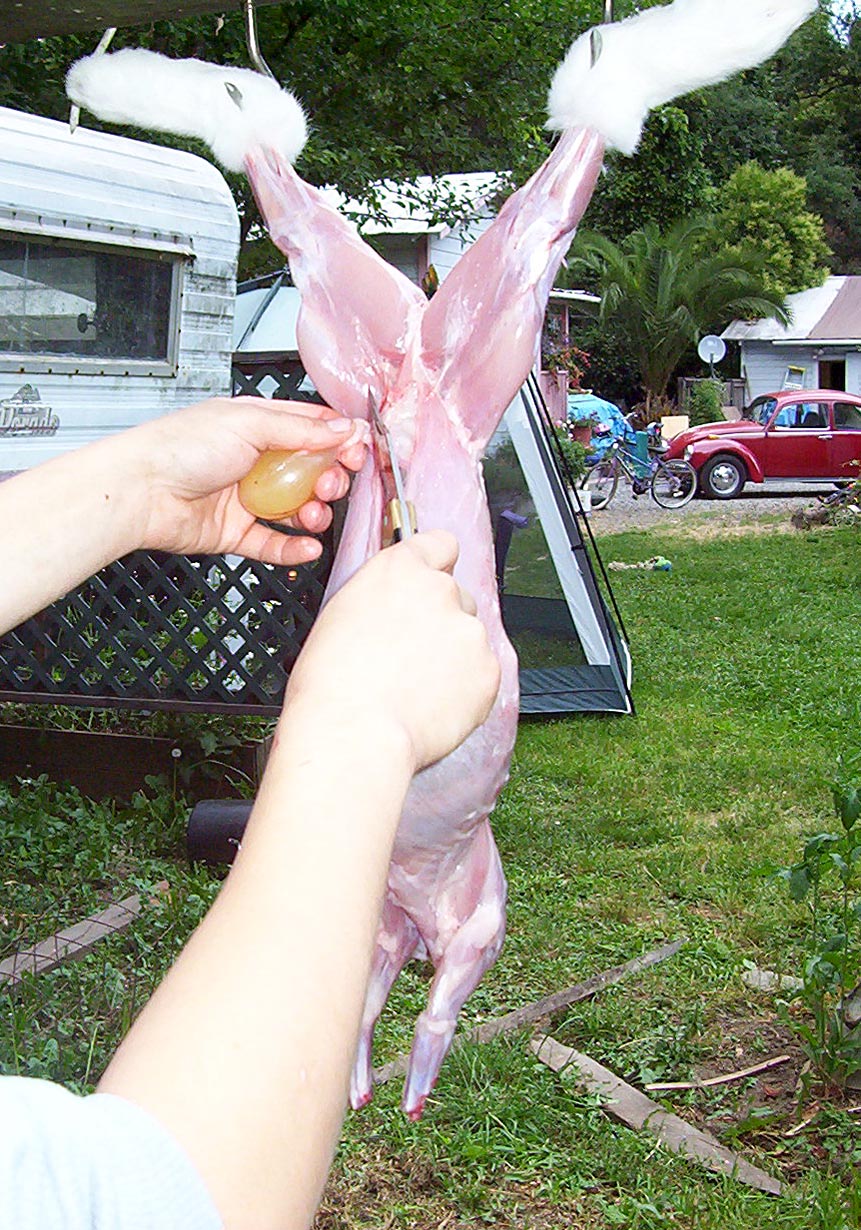
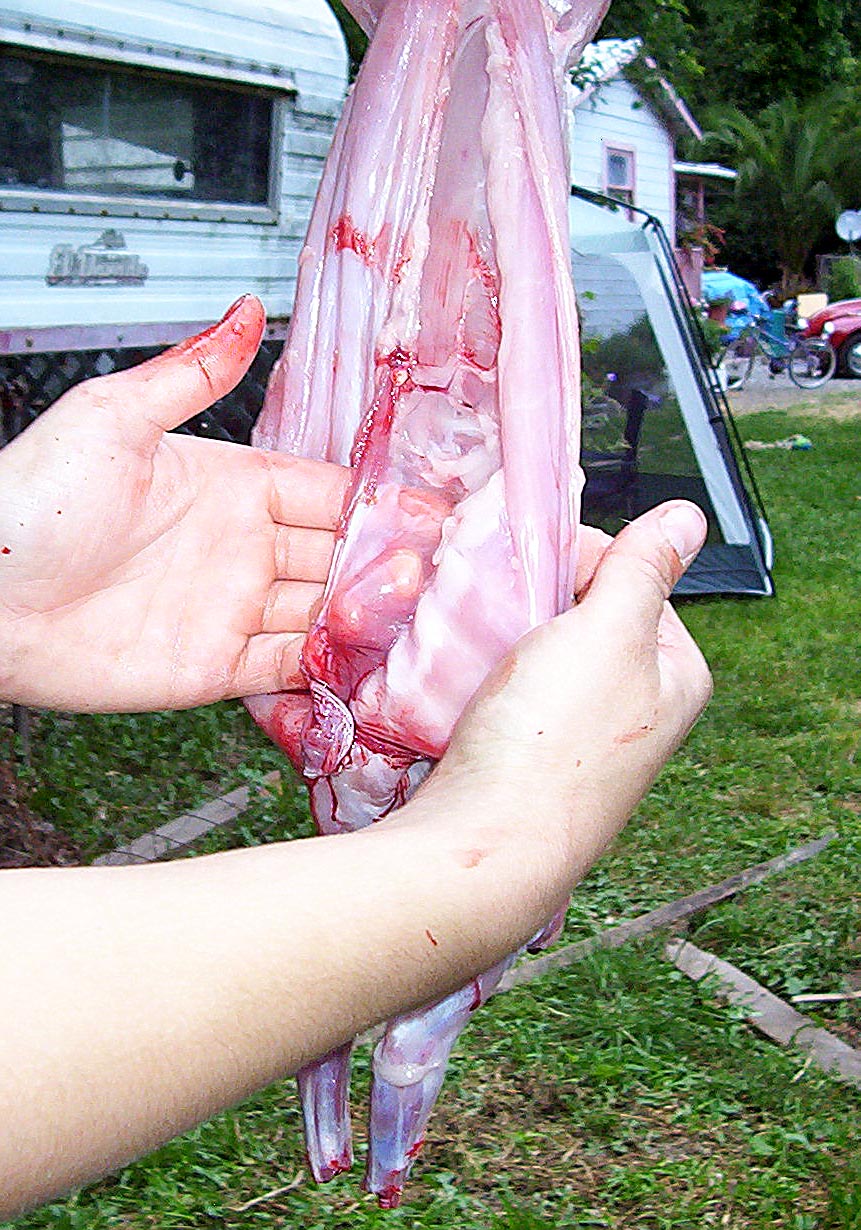
Step 7 & 8:
The Groin Area
It is hard to see in this picture
but I have used my index finger in the same fashion as above to separate the skin from the groin muscles. Now look at the
2nd picture. Once this is complete you can reach back with your less dominate hand and grab a hold of the tail. Pulling firmly
away from the rabbit and your face cut the tail off right at the base. Pay attention to where your fingers are because it’s
easy to slip and accidentally cut yourself in these steps.
Step 9:
Pulling the Pelt Down
After you have completed
steps 7 & 8 you are almost ready to pull the pelt down. First you must grad the skin that you separated in step 7 with
your less dominate hand and pull it away from the muscles. Then cut threw this with your knife so that it separated this section
from the tail section. Be very careful not to puncture the bladder during this step, as well as not to cut your hand. Now
put down your knife and grab the tail section with one hand and the front section with the other. Try and pull both sections
down at the same time and pull them all the way to the front legs. In older rabbits the pelt might stick to the belly section,
I believe it’s because of the fat content. In this case just take your
knife and cut threw the upper most membrane between the belly and the pelt. Use a cut and pull down method until you get the
pelt free. Be careful not to rip the meat if you encounter this problem, take your time and do it right. Another problem you
may run into here is if you take to much time between this step and the killing step. The faster you dress the animal out
the easier it goes.
Step 10:
Releasing the Front Leg
Once
you have pulled the pelt down to the front legs you will noticed they appear to be stuck. With both hands work the legs so
that the form a triangle sticking out of the pelt. There is a membrane you will need to break threw with your finger, sometimes
it’s to tough and you’ll need to start the hole with the tip of your knife. Using your fingers work the hole so
you can get your index and middle finger threw. Then pull the leg loose from the pelt, everything should be exposed except
for the foot. I hold on to the pelt for leverage at this point. You can see this in the picture below. Sometimes
the foot will pop out during this step as well and if it does just skip to step 11. Repeat for both front legs.
Step 11:
Cutting off the Front Feet
With the front legs exposed
you can now cut the front feet of one at a time. With your free hand make the ankle bend so that the joint is exposed. Cut
threw the tendons you have just exposed and the foot should come right off. Be careful not to cut yourself.
Step 12:
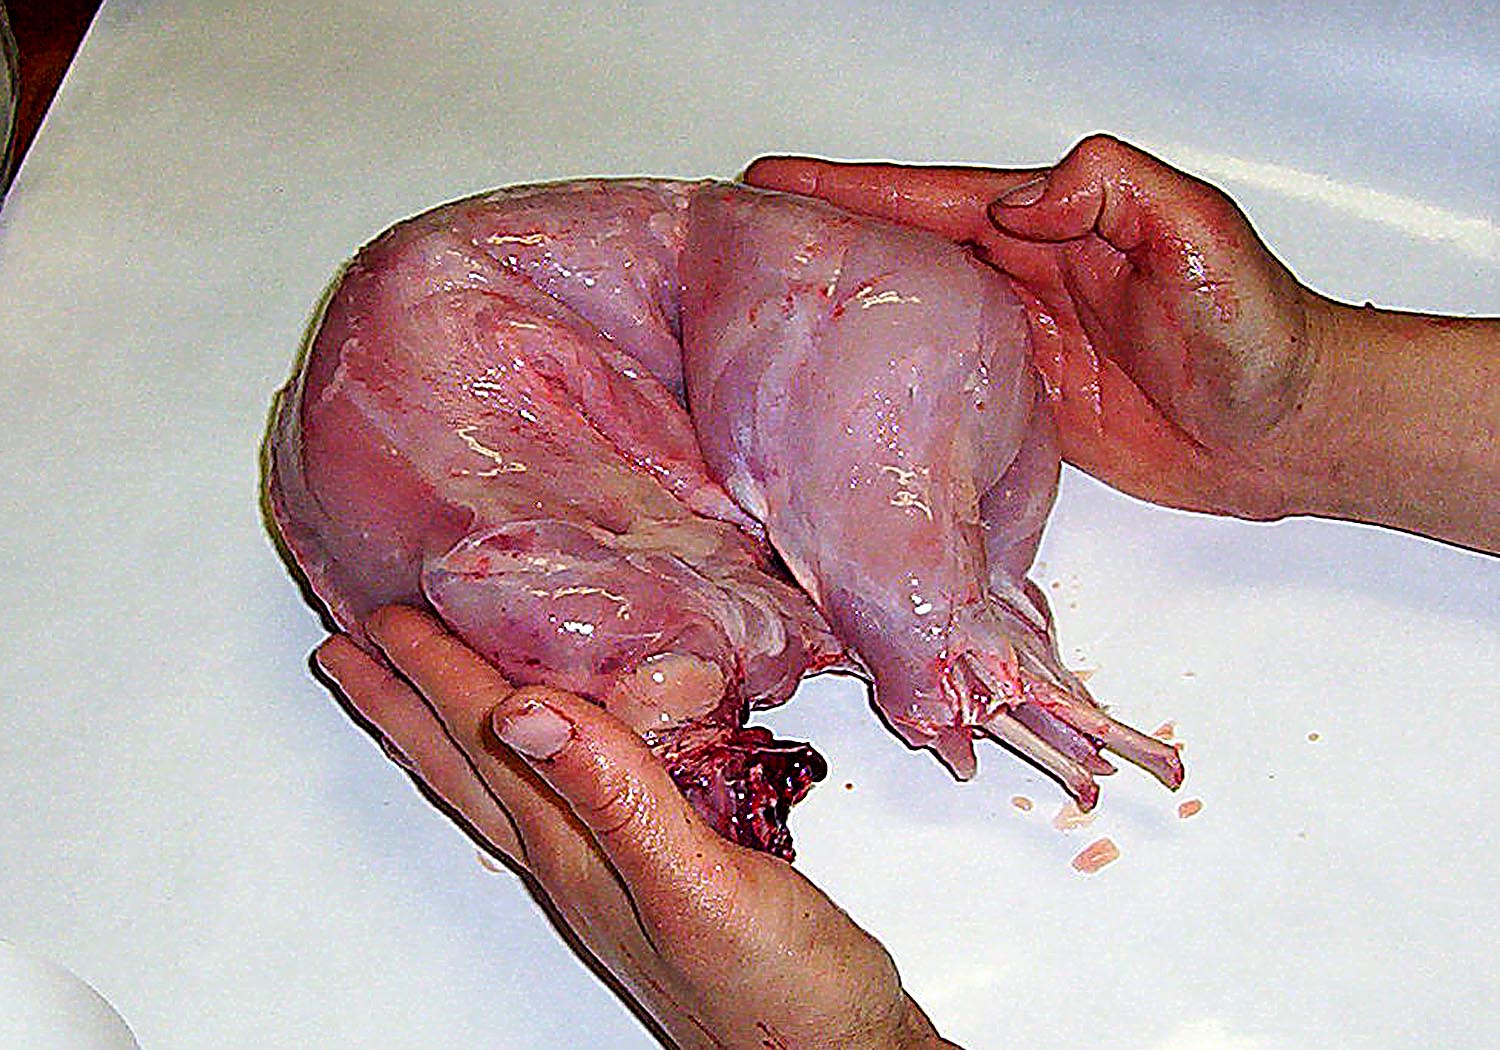
Cutting off the Head and Separating the Pelt from the Body
Pull
the pelt as far down as it will go. It will look like the picture below. Then cut right where the head meets the spinal core,
where you made contact in step 2. You will need to cut all the way around the spinal cord and then pull down. The bones should
separate with ease. Sometimes the head will just come off as you pull the pelt down. Notice that
there is no bruising on the shoulders from the kill hit. Now just drop the head and pelt into the bucket unless you are planning
on keeping the pelt.
Step 13:
Gaining Access to the Abdomen
Make
a small incision up close to the groin area just big enough for the tips of your index and middle fingers to get into. Then
using your fingers as a safety guide slid them down the abdominal wall with the blade sitting between then. If you only put
your knife in less than the width of your finger tips then this will insure that you don’t puncture any internal organs.
Now stop right above the rib cage and this will hold the internal organs in while you do step 14.
Step 14:
Removing the Bladder
Gently grab the bladder
and twist it about 7 times so the urine can’t squeeze out. While pinching
the section you just twisted with your free hand cut the bladder out and drop it into the bucket.
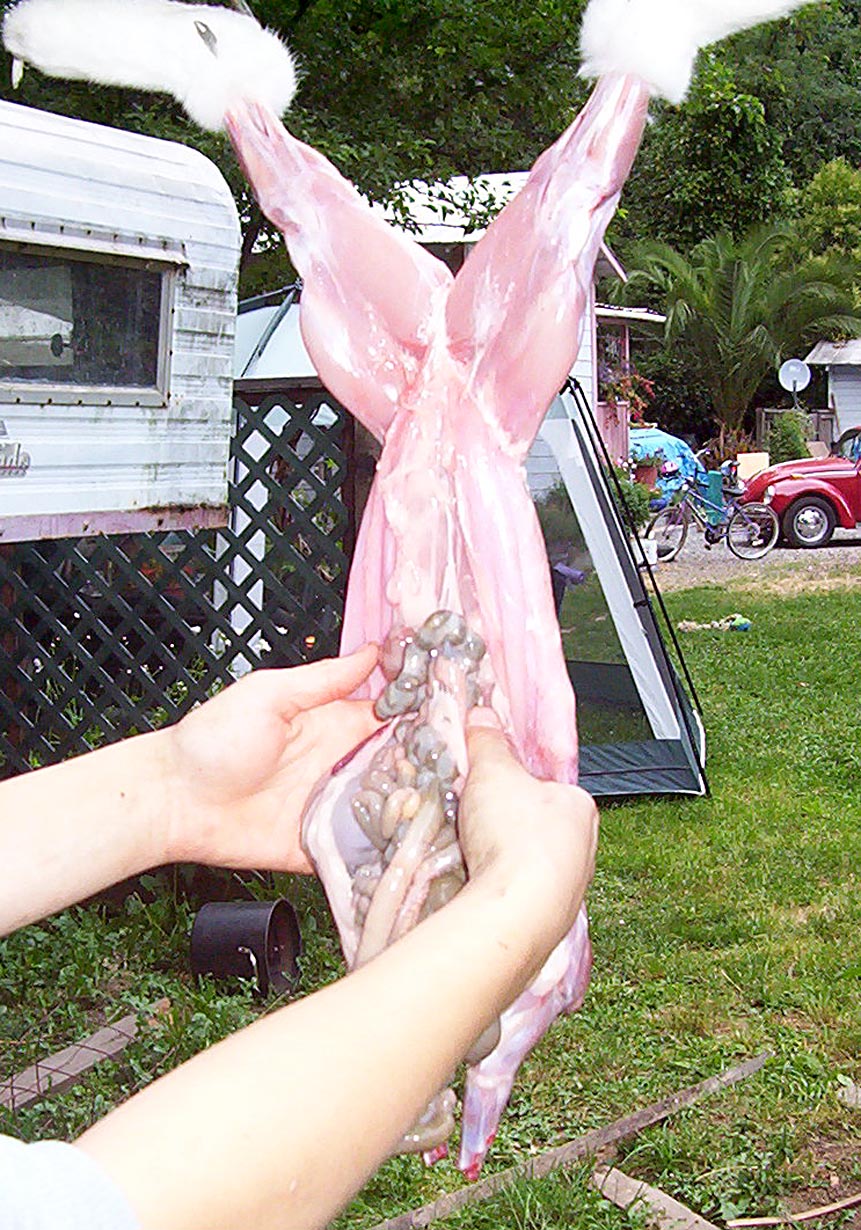
Step 15:
Remove the Internal Organs
Finish opening the abdomen
as you did in step 13. Then simply scoop out the internal organs with your hands as shown in the picture below. Gravity will
tear lose any membranes holding the organs in except for the trachea. To remove
this just grab the trachea and pull it out. (The trachea will feel ridged and ribed as comarped to the other internal
organs).
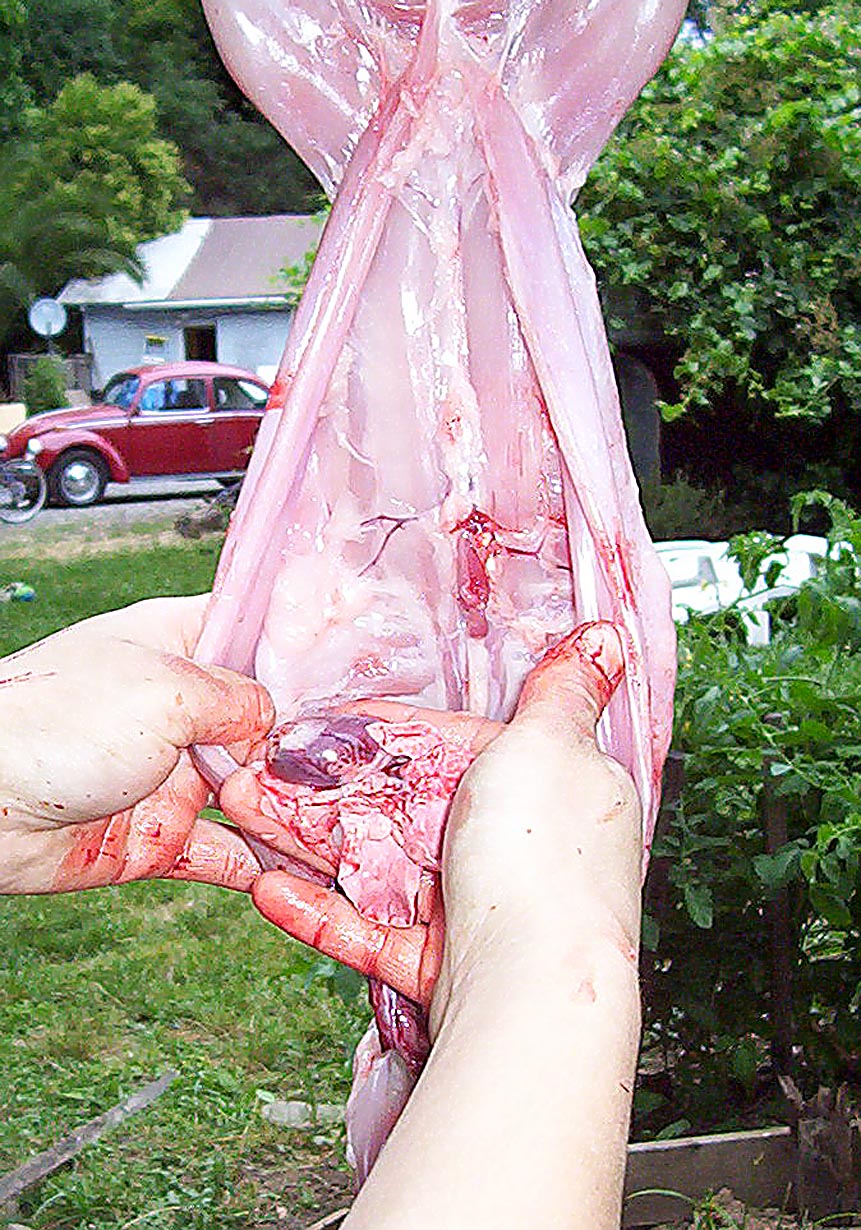
Step 16:
Remove the Kidneys
The kidneys should be the
only things left in the abdomen at this point. They are about the size of an egg and can be removed simply by grabbing and
pulling them out. They usually have some fat around them. Some people save the kidneys to eat as well. In the picture I am
removing a kidney. The kidney is the reddish thing and the white/yellow stuff is fat.
Step 17:
Removing the Diaphragm
You must remove the thin
layer of flesh that separated the chest cavity from the abdomen which is called the diaphragm. Just place your finger into
the small hole that was made when you removed the trachea and pull out the diaphragm. It should come out very easily.
If you have ripped the diaphragm, and it didn’t all come out at once than just continue pulling the pieces of it out
until completely gone. This exposes the heart and lungs. I have the diaphragm on top of my fingers in the picture below.
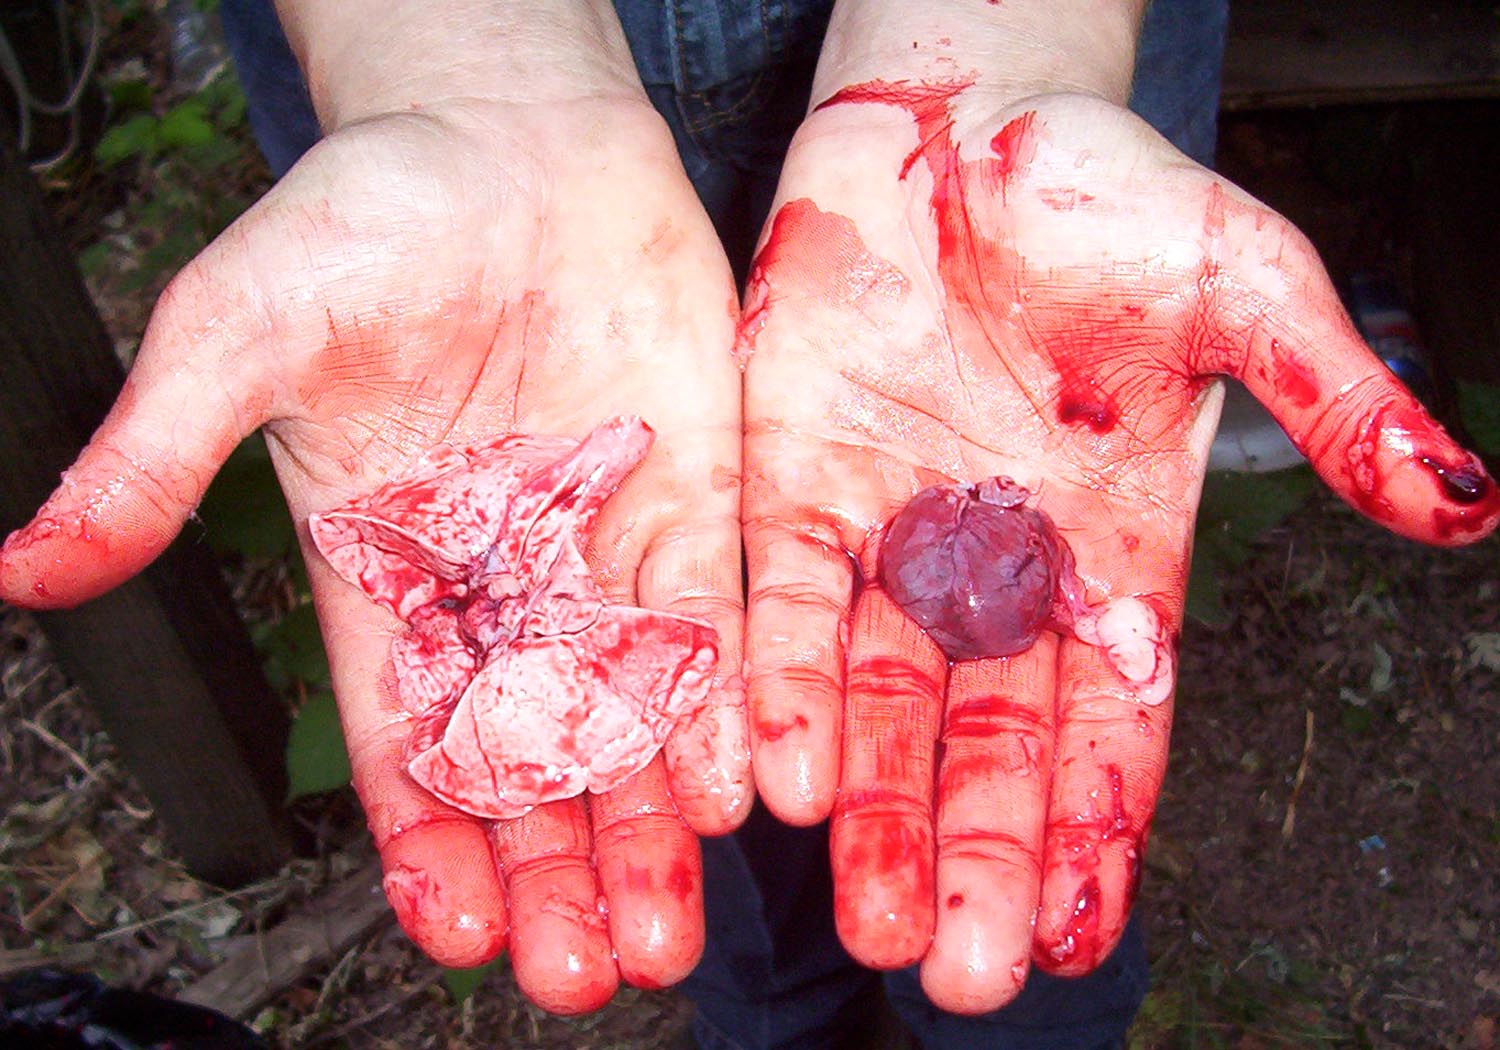
Step 18: Removing the Heart & Lungs
Just as you did to remove
the internal organs simply use your hands to scoop out the heart and lungs. Sometimes a piece of the trachea will still remain in the chest cavity and in the event just pull
it the rest of the way out. As you can tell by looking at my hands in the previous pictures this is the bloodiest part
of the butchering process. Many people save the heart to eat as well.
|
|
| Healthy Lungs (left) and Heart (right) |
Step 19:
Remove the Hind Feet
You’re almost done!
Remove one of the hind feet from the hook as shown in the picture below. With one hand grab the foot and with the other grab
the hind leg right above the ankle joint. Now you are going to break the foot off and this takes a little strength. You will
break the bone by forcing it in an unnatural direction. Once you have broken
the bone you can take your knife and cut the Achilles
tendon and sever the foot from the leg. Now remove the other leg from the hook
and repeat the process. This can be a bit tricky if you don’t have a table to lay the carcass on.
Step 20:
Rinsing the Carcass
I
have always brought my carcass inside to rinse the blood and hair off. Some people have a rinsing table outside, but then
you might have a bee/fly problem. When removing the carcass from the sink I let it drip over the sink for a little bit to
get some excess water off.
Step 21: Wrapping the Carcass
I
have always used butcher paper which you can purchase at the super market. You place the paper shinny side up and place the
carcass in the center as shown below. It helps to have an assistant at this point. Then wrap the paper around the carcass
and tape with freezer tape. I always double wrap to help prevent freezer burn. I know of a lot of people using the air-tight
seal-a-meals. I plan on upgrading to this method as well.
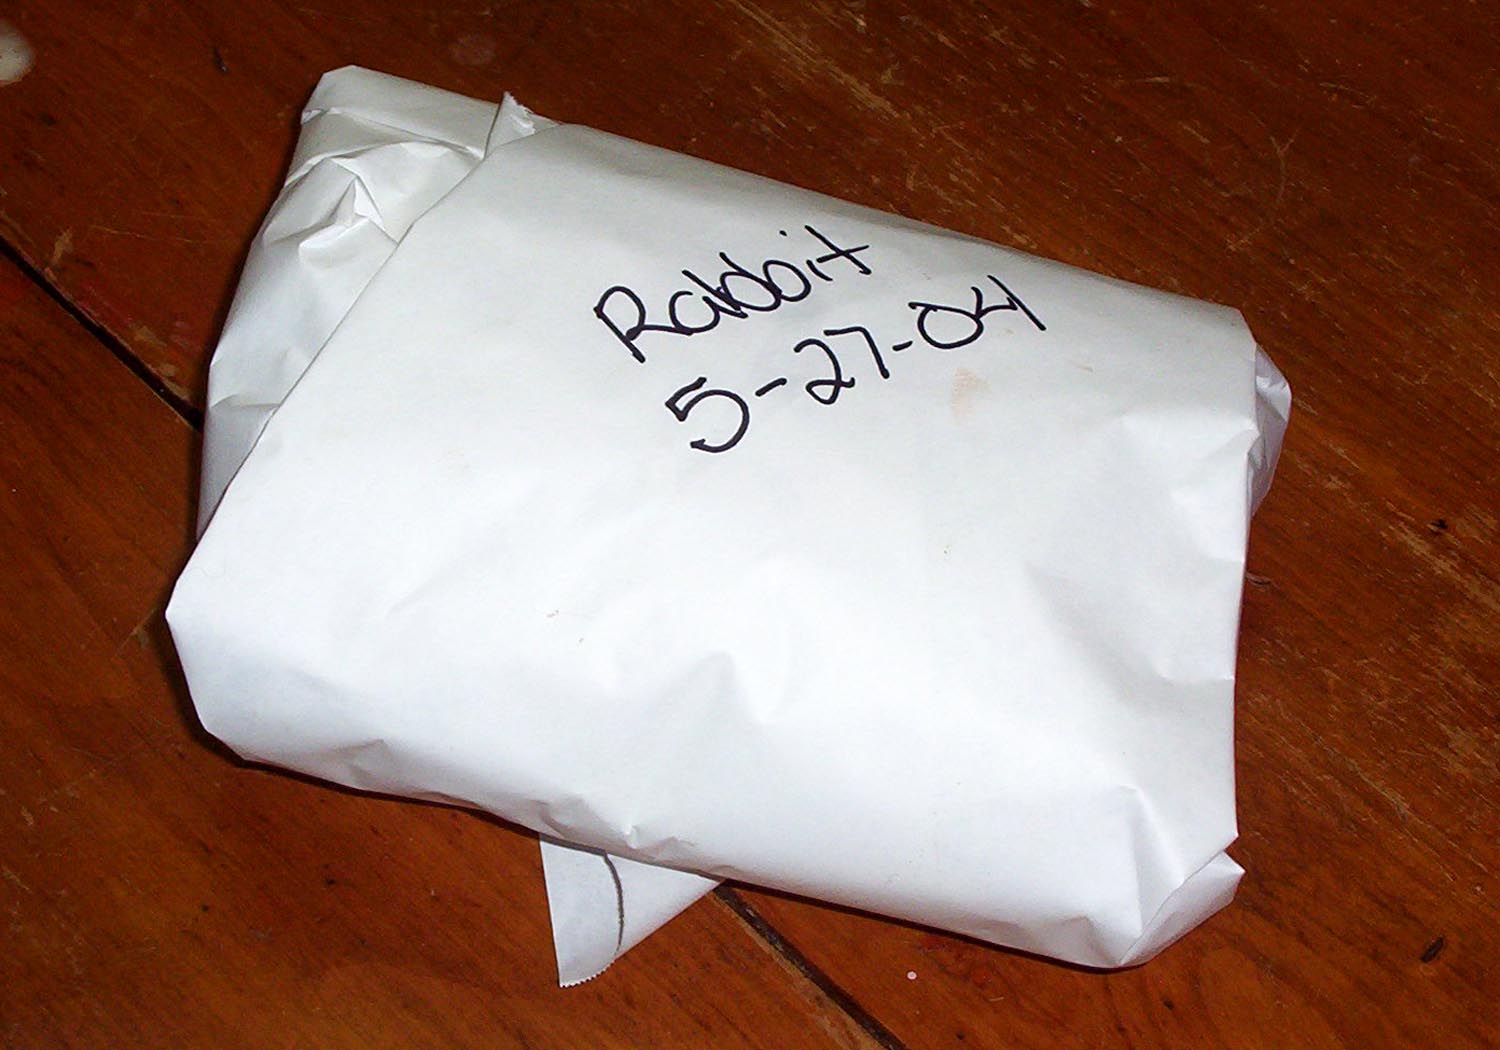
Step 22:
Labeling the Package
It
is very important to label your package! We butcher a lot of our own meat so our whole freezer is full of packages about this
size and shape. I always make sure to label the package with the date it was butchered and what it is just like in the picture
below.
Back to Ashley's Bragging Right's
|